Once you’ve got your emails sorted, sending them out into the world is easy! First, create the campaign in our system and then schedule when each email should go out. Then, sit back and let our automated sales system send them out for you. Additionally, you can use our system to manage other tasks like forwarding text messages, making calls, setting up to-dos, and more!
Learn how you can succeed in creating successful email campaigns by downloading our FREE Email Campaign Creation Guide:

It’s important to understand that in SalesNexus, there are 3 essential parts of an email marketing campaign:
- The email template
- The email campaign
- The lookup (the list of contacts you’ll send the campaign to)
These are all independent in SalesNexus so that you can use the same email template in multiple campaigns and you can add several different lookups (groups or lists of contacts) to a campaign over time.
Create your campaign with these simple steps:
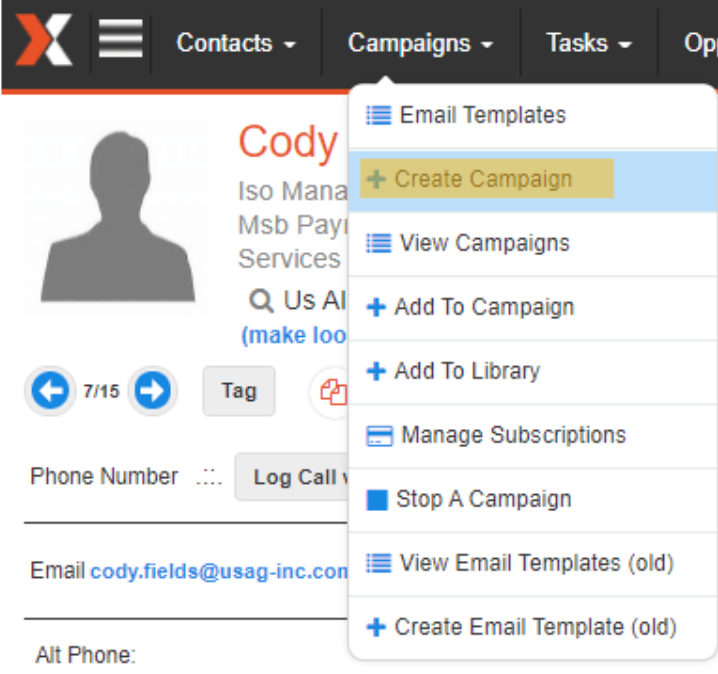
To get started, go to Campaigns > Create Campaign.
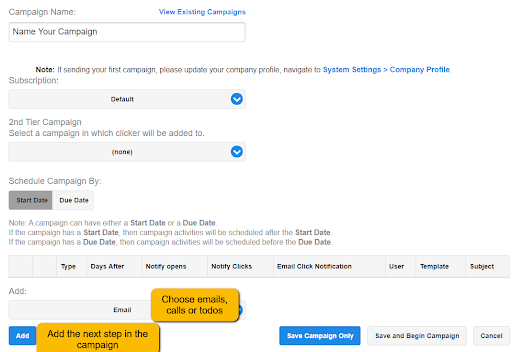
- Enter a name for your campaign. This is how you’ll find the analytics in the future.
- Add steps to your campaign. Under ADD leave EMAIL as the selection unless you want to add a call or todo. Then click ADD.
- Choose the From Address:
- Any User – Indicates that all emails will come from the email address in that user’s My Record.
- Current User – Uses the email in the My Record of the user that schedules the campaign, when adding a lookup to the campaign.
- Contacts Record Manager – Ensures that each recipient gets the email From the Record Manager (usually the sales person) for that contact.
- Choose the # of days after the start date. Usually 0 for a single email campaign. If your campaign will have multiple steps, this is how you define when each step happens in the overall sequence.
- Turn on notifications – SalesNexus will track opens and clicks even if these options are turned off. Open Notifications and Click Notifications will place a Click Notification task on the Task List of the user who the email was sent From, for any contact that has either an open or click on this email. Email Click Notifications will send that user an email notification of the click for each contact that clicks on that email.
- Enter your subject line. Make sure it will get your audience’s attention.
- Choose the template. Simply type the template name in the search box and choose among your created email templates
- Click Save.
- Repeat this process for as many different steps as you need in the campaign.
For more detailed examples on how to create and send out successful email campaigns, download the Email Campaign Creation Guide for FREE!